ESP32 BLE | Quick & Easy Steps to Use with Arduino IDE
In this blog, we’ll walk through the quick and easy steps to get started with Arduino IDE for programming the ESP32 BLE functionality. If you're new to Arduino IDE or ESP32 BLE, don’t worry — this guide will cover everything from setup to writing a simple ESP32 BLE application.
Contents
Introduction
The ESP32 is a powerful microcontroller that integrates Bluetooth Low Energy (BLE) and Wi-Fi capabilities, making it ideal for Internet of Things (IoT) projects. The ESP32 BLE is one of its popular features, and incorporating it into your project can enable a wide range of applications, from remote control systems to sensor data transmission, and much more.
Installing the Arduino IDE to Develop ESP32
If you haven't installed the Arduino IDE yet, head over to the official Arduino website to download and install the latest version. The Arduino IDE is a cross-platform tool, compatible with Windows, macOS, and Linux.
Configuring Arduino IDE to Support ESP32
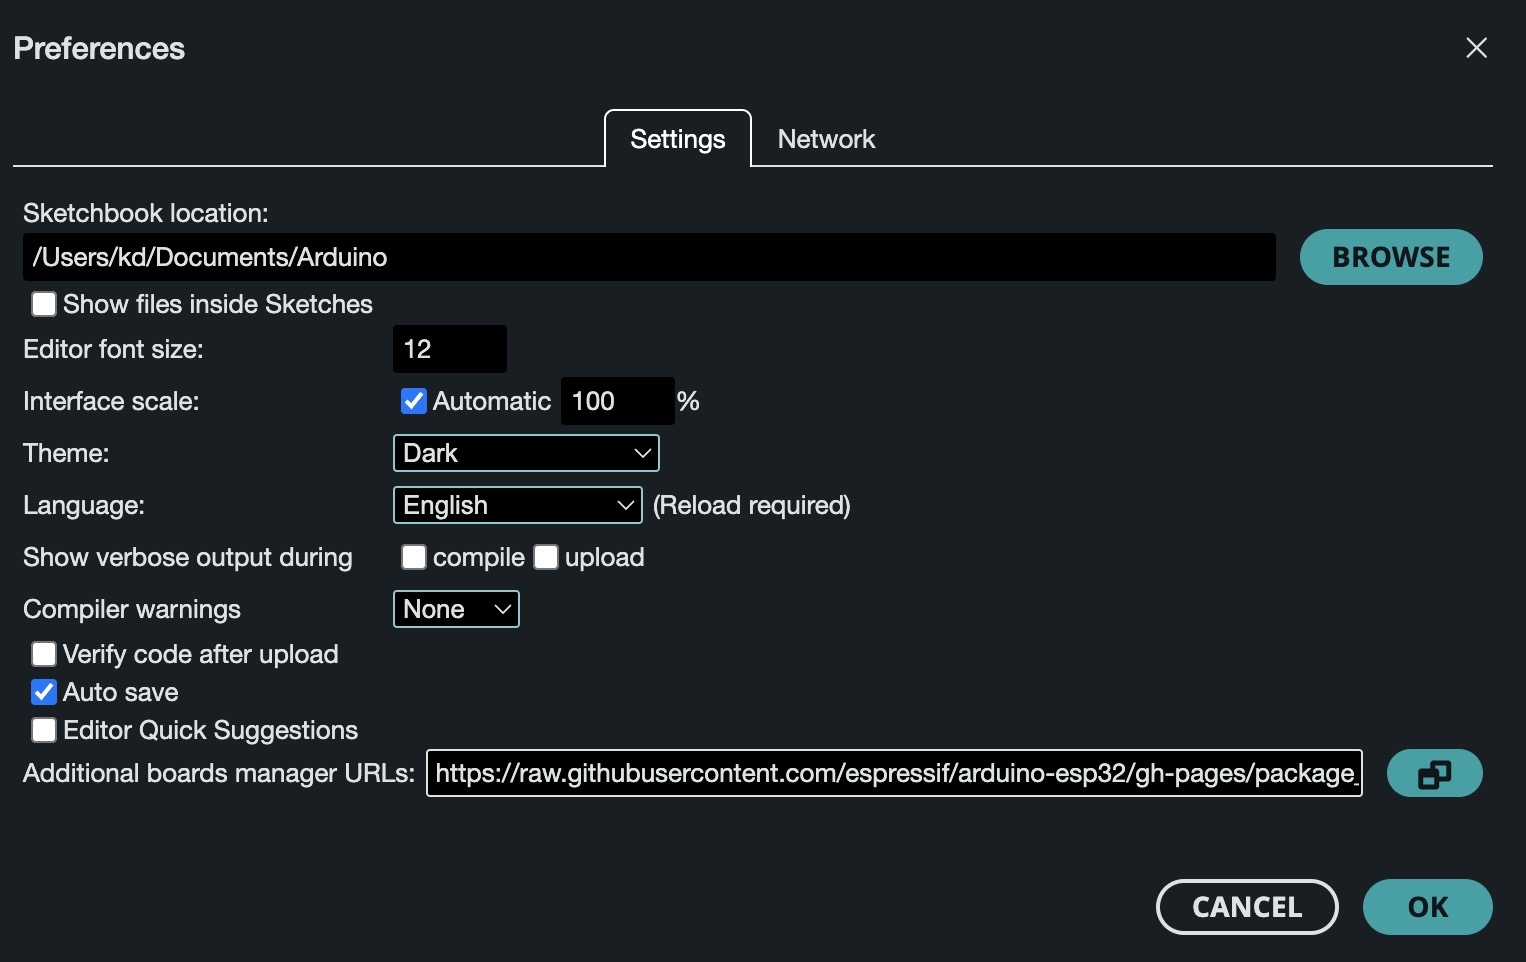
1. Open the Arduino IDE and select Arduino > Preferences (for macOS).

2. In the Additional Boards Manager URLs field, add the following URL:

https://raw.githubusercontent.com/espressif/arduino-esp32/gh-pages/package_esp32_index.json

* If you already have other URLs in the field, you can add this URL after them, separated by commas.

3. Click OK to save the settings.
Installing ESP32 Board Support
1. Open the Arduino IDE and go to Tools > Board > Board Manager.
2. In the search box, type ESP32, find "esp32" by Espressif Systems, and click Install.
Selecting the ESP32 Development Board
After installation, go to Tools > Board and select ESP32 Dev Module from the list. This is a commonly used ESP32 board model.
Basic ESP32 BLE Sketch
Now it’s time to upload a basic BLE sketch to your ESP32 to verify everything is set up properly.

1. Open a new sketch in the Arduino IDE.

2. Copy and paste the following code, which demonstrates how to set up a simple BLE server:
#include <BLEDevice.h>
#include <BLEUtils.h>
#include <BLEServer.h>

BLECharacteristic *pCharacteristic;

#define SERVICE_UUID        "12345678-1234-1234-1234-123456789abc"
#define CHARACTERISTIC_UUID "87654321-4321-4321-4321-123456789abc"

void setup() {
  Serial.begin(115200);
  BLEDevice::init("ESP32_BLE_Server");  // Initialize BLE
  BLEServer *pServer = BLEDevice::createServer();  // Create BLE Server
  BLEService *pService = pServer->createService(SERVICE_UUID);  // Create BLE Service
  pCharacteristic = pService->createCharacteristic(
                      CHARACTERISTIC_UUID,
                      BLECharacteristic::PROPERTY_READ | BLECharacteristic::PROPERTY_WRITE
                    );
  pCharacteristic->setValue("Hello BLE");
  pService->start();  // Start the BLE Service
  BLEAdvertising *pAdvertising = pServer->getAdvertising();
  pAdvertising->start();  // Start advertising BLE service
  Serial.println("BLE Server is ready and advertising!");
}

void loop() {
  // Nothing to do here
}
1. This code creates a BLE server that advertises a service and a characteristic.
2. The SERVICE_UUID and CHARACTERISTIC_UUID are unique identifiers for your service and characteristic. These are used by clients to interact with the server.
BLE Server (Server) | BLE Client (Client)
| Role | BLE 伺服器 (Server) | BLE 客戶端 (Client) |
| Function | Provides services and characteristics, waits for client requests | Initiates connection, reads/writes characteristics, subscribes to notifications |
| Request Initiation | Passive, waits for client actions | Active, initiates requests and connections |
| Data Storage | Stores characteristic data, provides functionality | Reads/Modifies data provided by the server |
| Typical Devices | Smart bulbs, sensors, monitoring devices, etc. | Smartphones, tablets, etc. |
| Connection Mode | Broadcasts and waits for connection | Scans and selects available servers to connect |
Uploading the Program to ESP32
1. Connect the ESP32 development board to your computer using a USB data cable.

2. In the Arduino IDE, go to Tools > Port and select the correct port (for example, it is usually COM3 on Windows and /dev/ttyUSB0 on Linux/macOS).

3. Click the Upload button to upload the program to the ESP32.
Results
Once the upload is successful, the ESP32 will start advertising its BLE service.

1. Open a BLE scanner app on your smartphone (e.g., nRFConnect for Mobile).

2. Scan for available BLE devices and you should see ESP32_BLE_Server.

3. Connect to the ESP32, and you should be able to see the Hello BLE message from the characteristic.
Conclusion
Using Arduino IDE with the ESP32 for BLE projects is an easy and powerful way to get started with Bluetooth Low Energy. By following these simple steps, you can set up the environment, upload a basic ESP32 BLE sketch, and even test the connection using a smartphone app. From here, you can extend your project by exploring more complex BLE interactions, like connecting multiple devices or controlling IoT hardware.

Happy coding and exploring with ESP32 BLE!

