Master ESP32 Partition Table | Easily Configure with Partition Table Editor UI
When developing applications for ESP32, managing and configuring the partition table (ESP32 Partition Table) is an essential task. ESP32 has a flexible flash memory management system that allows us to partition the flash into different sections for various purposes. However, with the introduction of the Partition Table Editor UI, this process has become much easier. This graphical interface enables developers to set up and adjust partitions intuitively, without needing to worry about the syntax of CSV files.
Contents
Introduction
Compared to manually editing the partitions.csv file, the Partition Table Editor UI provides a more user-friendly interface. It allows you to configure your partitions as easily as assembling a LEGO set, with simple drag-and-drop operations. Whether you are a beginner or an experienced developer, you can quickly get started with it. It supports various partition types and can generate a partition table that meets the required specifications, reducing the risk of configuration errors. For instance, when developing IoT devices, we might need to divide the flash into different blocks like the bootloader, application, OTA updates, and data storage. The Partition Table Editor UI helps us achieve these configurations quickly.
What is the ESP32 Partition Table?
The ESP32 Partition Table is used to define the structure of the internal flash memory. Each partition represents a storage area with a specific purpose. Common partitions include:
- Bootloader (Boot Program): The program that runs first when the ESP32 is powered on, typically located at offset 0x1000 in flash memory.
- Application Partitions (app0, app1): Used to store the main application and support OTA (Over-The-Air) updates.
- Data Partitions (e.g., NVS, SPIFFS): Used to store configuration data or file systems for the device.
- OTA Partitions: Used to store OTA update data.
The partition table specifies the type, size, and location of these partitions, and helps ESP32 determine how to handle each partition during boot.
Development Environment
Before starting your programming, make sure to complete the following preparations:
- Install ESP-IDF (version 4.4 or higher): ESP-IDF is the official development framework for programming the ESP32, and it supports multiple operating systems such as Windows, macOS, and Linux.
- ESP32 Development Board: An ESP32 board is required.
How to Use the Partition Table Editor UI to Configure the Partition Table
Opening the Partition Table Editor UI
Ensure you have ESP32 IDF and the VS Code plugin installed. When you create a new ESP32 project, navigate to the partitions.csv file in the ESP-IDF toolset. Right-click on the file and select “Open in Partition Table Editor” to open the Partition Table Editor UI.
If your ESP32 project does not have the default partitions.csv file, you can create it manually or use ESP-IDF’s tools to generate a custom partition table.
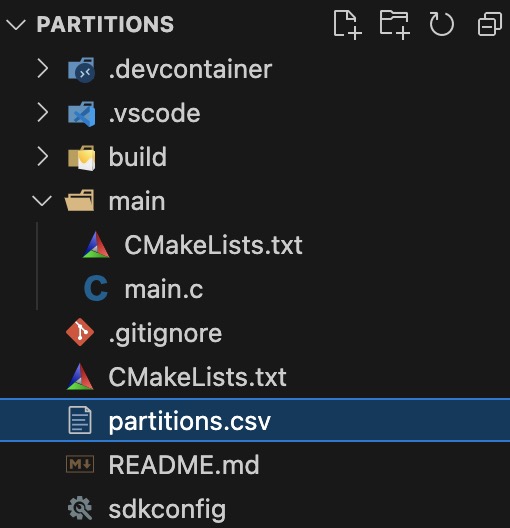
When you select the ESP-IDF framework for your ESP32 development board, the typical project directory structure looks like this:
<project_name>/
├── CMakeLists.txt        # CMake file for compiling the project
├── main/                 # Directory with your application code
│   ├── CMakeLists.txt    # CMake file for the main application
│   └── main.c            # The main program code
├── partitions.csv        # Custom partition table file (if used)
├── sdkconfig             # Configuration file
└── README.md
Editing the Partition Table
Right-click on the partitions.csv file and select “Open with Partition Table Editor”. Once you open the Partition Table Editor UI, it will display a visual chart of the flash layout. You can perform the following actions:
- Add a Partition: Click the “+” button to add a new partition. Choose the partition type (e.g., app, data, etc.), and set properties such as size and offset.
- Adjust Partition Size: Drag the partition borders to adjust their size easily.
- Delete a Partition: Select a partition and click the delete button to remove unnecessary partitions.

Save and Apply
After making your changes, click “Save” to save the modifications.
Modifying Partition Table Settings
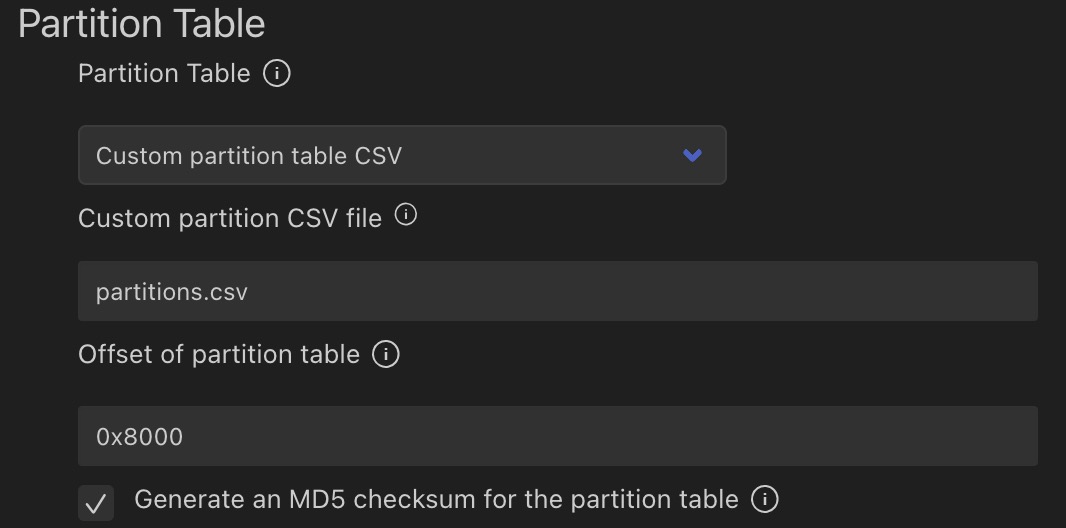
In VS Code, press Ctrl+Shift+P (Windows/Linux) or Cmd+Shift+P (Mac) to open the command palette, and use SDK Configuration Editor. In the SDK Configuration Editor, find the Partition Table option and set it to Custom partition table CSV, then specify the path to your custom partitions.csv file. After saving the changes, the SDK Configuration Editor will automatically update the sdkconfig file, so no manual editing is required.
Compiling and Flashing
After modifying the partition table, press Ctrl+Shift+P (Windows/Linux) or Cmd+Shift+P (Mac) to open the command palette, type ESP-IDF: Build, and select the command. VS Code will then compile the project.
Example ESP32 Partition Table
You can use the default partitions_singleapp.csv as a reference, which looks like this:
# Name,   Type, SubType, Offset,  Size, Flags
# Note: if you have increased the bootloader size, make sure to update the offsets to avoid overlap
nvs,      data, nvs,     ,        0x6000,
phy_init, data, phy,     ,        0x1000,
factory,  app,  factory, ,        1M,

The meaning of each field:
- Name: The partition’s name, used to identify it. This name is used in the application to access a specific partition.
- Type:
apprefers to the application partition.datarefers to data partitions used to store non-application data. - SubType: The partition’s subtype, specifying its role. For example,
nvs(Non-Volatile Storage) is used for configuration data,phyis used for Wi-Fi PHY calibration data, andfactoryis the factory default application partition. - Offset: The starting address of the partition, usually omitted to let the tool calculate it automatically. If custom, you need to avoid overlapping partitions.
- Size: The size of the partition, specified in hexadecimal or a simple numeric format (e.g.,
0x1000or1M). - Flags: Special flags, typically left blank.
Conclusion
The ESP32 Partition Table is crucial to the operation of the device, and the Partition Table Editor UI provides a simple yet powerful way to manage these partitions. With this tool, you can easily create and configure partition tables, improving development efficiency and eliminating the hassle of manually editing CSV files. Whether you’re a beginner or an experienced developer, this tool will significantly simplify partition management in your ESP32 projects.

