2025 還在用 Objective-C?透過 VSCode 打造強大 macOS 時鐘應用!
當許多開發者將目光轉向 Swift 和現代框架時,Objective-C 常被認為已走入歷史舞台。但在許多底層應用、macOS 桌面開發,甚至與 IoT 裝置整合的情境中,Objective-C 依然展現出它靈活與高效的一面。我將示範如何在 2025 年,透過 VSCode 搭配 Objective-C 打造一款 macOS 桌面時鐘應用,並為未來擴充至 IoT 裝置打下基礎。

內容
為什麼選擇 Objective C?
雖然 Swift 是蘋果的官方推廣語言,但 Objective-C 依然有它不可取代的價值。許多現存的 macOS 和 iOS 框架仍然是基於 Objective-C 寫成的,並且它的運行效率和成熟的生態系統仍然無可替代。如果你曾經接觸過 Apple 的 App 開發,特別是老舊的專案或內部開發工具,Objective-C 仍然是非常常見的語言。
此外,Objective-C 強大的動態運行時系統和簡潔的語法讓它在許多系統層級的開發中依然保持競爭力。
為什麼不選 Xcode?選擇 VSCode 來開發
大部分 Apple 開發者習慣於使用 Xcode 來開發應用程式,但對於那些喜歡自訂工作流程的開發者來說,VSCode 是一個極好的替代方案。VSCode 不僅輕便,還具有強大的擴展支持,使其成為許多開發者的首選編輯器。
VSCode 支援多語言和多種工具鏈,並且能夠完美配合 Objective-C 和 C++ 進行開發。它的靈活性和自訂功能可以讓你在開發過程中不受制於某些 IDE 的框架限制,並且還能夠輕鬆管理大型專案。
環境搭建
開始之前,請確保已安裝以下軟體:
- VSCode(下載)
- C++ 編譯器(GCC/Clang/MSVC)
- CMake Tool 擴展
- 安裝 Xcode Command Line Tools
開發 Objective-C 應用程式需要一些來自 Apple 的工具鏈。打開終端機並執行以下命令來安裝 Xcode 的命令行工具:
xcode-select --install在 VSCode 建立 C++ 專案
建立一個資料夾 MacClockApp 並開啟 VSCode 再建立如下的檔案結構 ,並在資料夾中建立以下檔案結構:
MacClockApp/
├── CMakeLists.txt   # CMake configuration
├── main.mm          # Main app file (includes C++ time logic)
創建 macOS 時鐘應用程式
在 VSCode 中,創建一個新的文件夾作為你的專案根目錄,並按照上面的指示設置檔案結構。
在專案文件夾中,創建一個名為 main.mm 的文件,並將以下代碼粘貼到文件中:
#import <Cocoa/Cocoa.h>
#include <ctime>
#include <sstream>

// C++: Get current time as HH:MM:SS
std::string getCurrentTime() {
    time_t now = time(nullptr);
    tm *ltm = localtime(&now);

    std::ostringstream oss;
    oss << (ltm->tm_hour < 10 ? "0" : "") << ltm->tm_hour << ":"
        << (ltm->tm_min < 10 ? "0" : "") << ltm->tm_min << ":"
        << (ltm->tm_sec < 10 ? "0" : "") << ltm->tm_sec;
    return oss.str();
}

// App delegate
@interface ClockAppDelegate : NSObject <NSApplicationDelegate>
@property (strong) NSWindow *window;
@property (strong) NSTextField *label;
@property (strong) NSTimer *timer;
@end

@implementation ClockAppDelegate

// Quit app when window is closed
- (BOOL)applicationShouldTerminateAfterLastWindowClosed:(NSApplication *)sender {
    return YES;
}

- (void)applicationDidFinishLaunching:(NSNotification *)aNotification {
    // Create window
    NSRect frame = NSMakeRect(0, 0, 600, 200);
    self.window = [[NSWindow alloc] initWithContentRect:frame
                                               styleMask:(NSWindowStyleMaskTitled |
                                                          NSWindowStyleMaskClosable |
                                                          NSWindowStyleMaskMiniaturizable)
                                                 backing:NSBackingStoreBuffered
                                                   defer:NO];
    [self.window setTitle:@"Big Clock"];
    [self.window center];

    // Create label
    self.label = [[NSTextField alloc] initWithFrame:NSMakeRect(50, 50, 500, 100)];
    [self.label setBezeled:NO];
    [self.label setDrawsBackground:NO];
    [self.label setEditable:NO];
    [self.label setSelectable:NO];
    [self.label setAlignment:NSTextAlignmentCenter];

    // Set large font
    NSFont *font = [NSFont systemFontOfSize:100.0];
    [self.label setFont:font];

    [[self.window contentView] addSubview:self.label];

    // Start timer to update clock every second
    self.timer = [NSTimer scheduledTimerWithTimeInterval:1.0
                                                  target:self
                                                selector:@selector(updateTime)
                                                userInfo:nil
                                                 repeats:YES];

    [self.window makeKeyAndOrderFront:nil];
    [self updateTime];
}

// Update label with current time
- (void)updateTime {
    std::string timeStr = getCurrentTime();
    NSString *time = [NSString stringWithUTF8String:timeStr.c_str()];
    [self.label setStringValue:time];
}

@end

// Main entry point
int main(int argc, const char * argv[]) {
    @autoreleasepool {
        NSApplication *app = [NSApplication sharedApplication];
        ClockAppDelegate *delegate = [[ClockAppDelegate alloc] init];
        [app setDelegate:delegate];
        return NSApplicationMain(argc, argv);
    }
}
配置 CMakeLists.txt
在你的專案根目錄中,創建一個名為 CMakeLists.txt 的文件,並添加以下內容來設置 CMake 項目:
cmake_minimum_required(VERSION 3.16)
project(MacClockApp LANGUAGES C CXX OBJCXX)

# Set C++ and Objective-C++ standards
set(CMAKE_CXX_STANDARD 17)
set(CMAKE_OBJCXX_STANDARD 17)

# Build the app executable
add_executable(MacClockApp
    main.mm
)

# Link the Cocoa framework for macOS GUI apps
target_link_libraries(MacClockApp
    "-framework Cocoa"
)
編譯與執行
打開命令面板
按下 Cmd + Shift + P(Windows/Linux 是 Ctrl + Shift + P),輸入:
CMake: Build然後按下 Enter,CMake 就會自動幫你產生 build/ 資料夾,並完成編譯流程。
執行應用程式(macOS 專用)
在終端機輸入以下指令:
./build/MacClockApp最終成果畫面
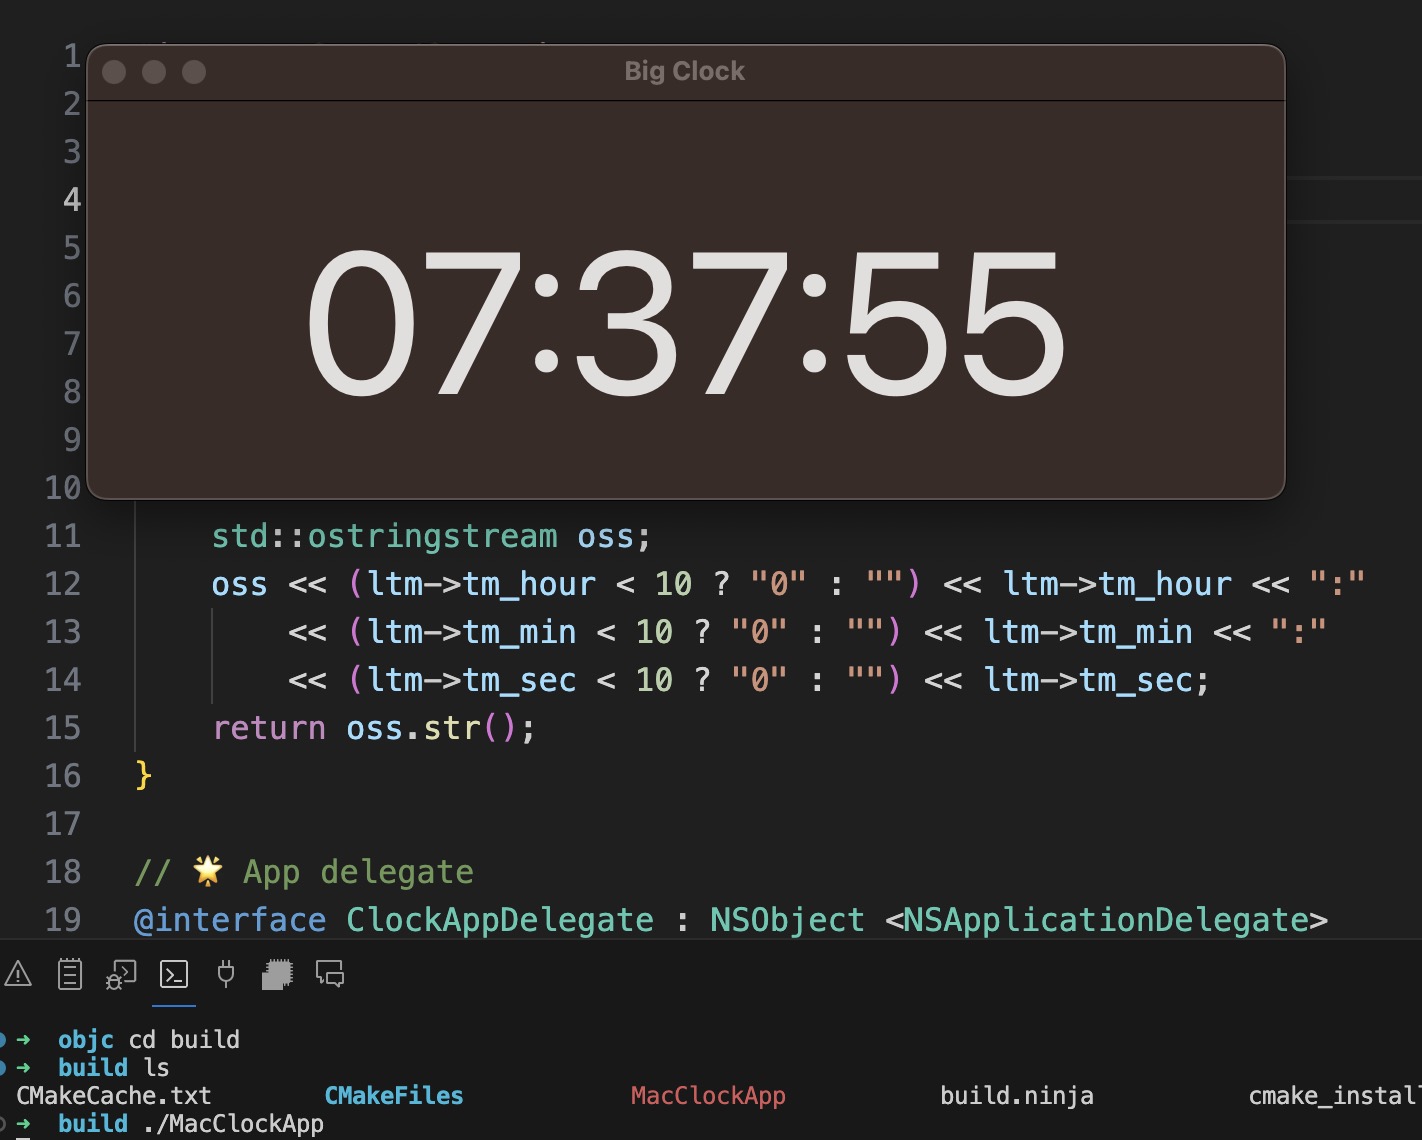
當你成功執行 ./build/MacClockApp,你應該會看到一個乾淨簡潔的視窗,裡面顯示著現在的時間,大約長這樣:

結論
儘管現在很多新手開發者選擇 Swift 或其他現代語言來開發 macOS 和 iOS 應用程式,但 Objective C 依然是一個強大且不可忽視的工具。透過這篇文章,你不僅學會了如何使用 VSCode 和 CMake 來開發 macOS 應用,還證明了 即便在 2025 年,Objective C 仍然能夠為你帶來強大的開發體驗。


