如何使用 Arduino IDE 開發 ESP32
內容
簡介
ESP32 是一款功能強大的微控制器,內建 Wi-Fi 和藍牙,經常用於物聯網(IoT)應用開發。它不僅性能優越,而且價格低廉,因此吸引了無數開發者。而 Arduino IDE 則提供了一個簡單易用的平台,使得編寫、編譯和上傳程式到 ESP32 變得極為方便。

在這篇 Blog 中,我將帶你從零開始,使用 Arduino IDE 開發 ESP32 應用程序,並展示如何用簡單的程式控制 ESP32 上的 LED。
安裝 Arduino IDE 開發 ESP32
配置 IDE 編輯器以支持 ESP32
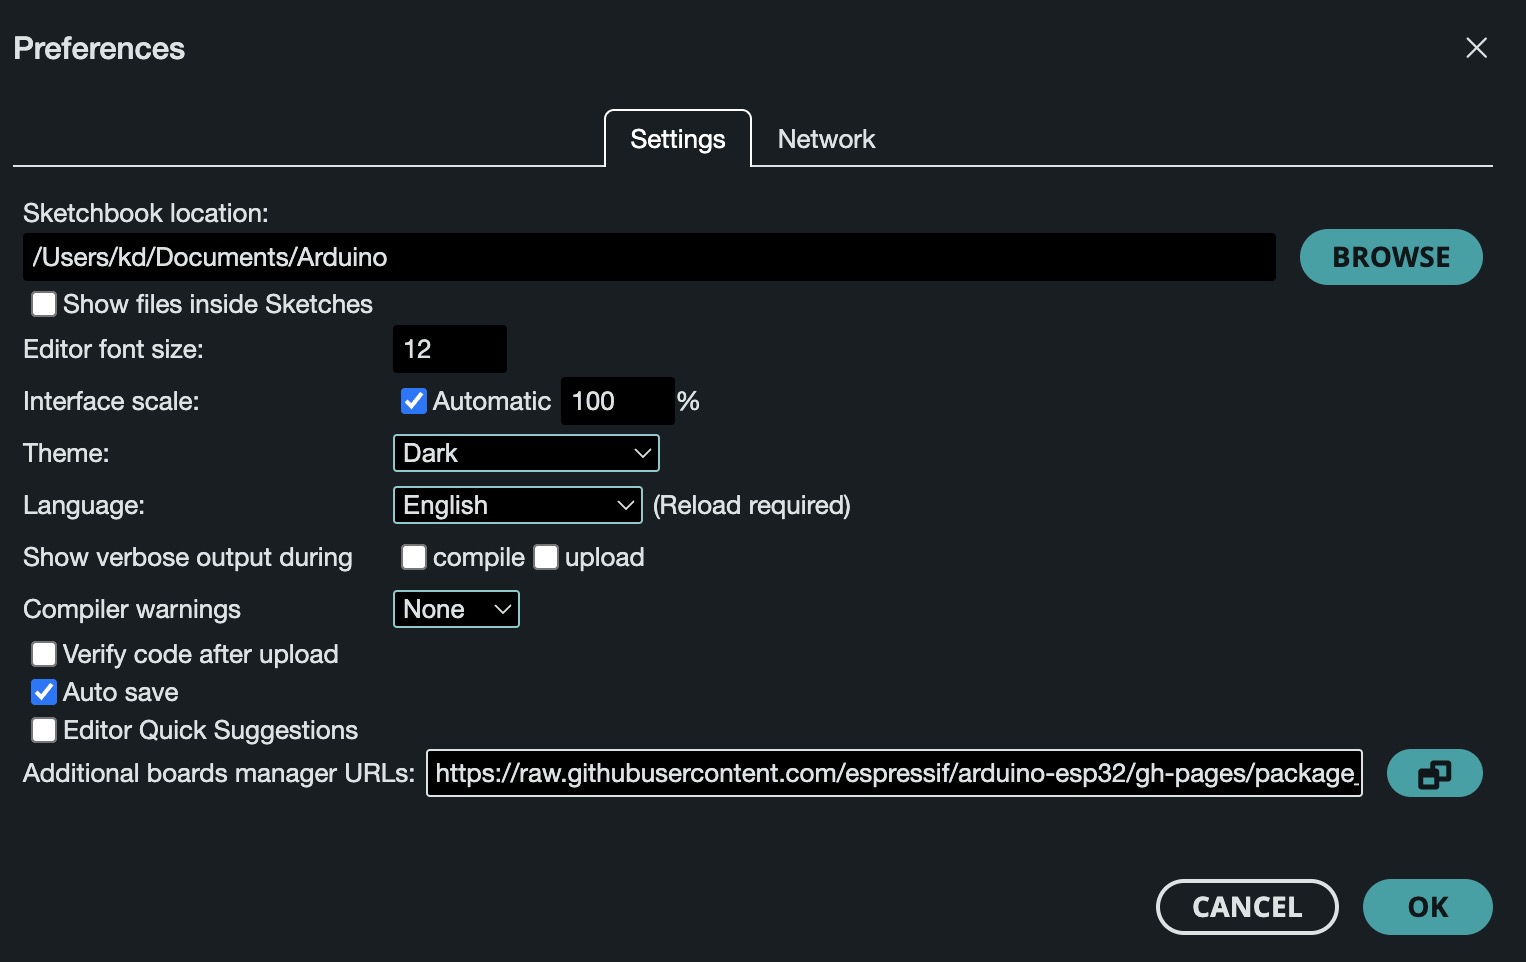
1. 打開IDE 編輯器,然後選擇「Arduino > Settings...」。 ( MacOS 為例 )
2. 在「附加開發板管理網址」欄位中,添加以下網址:

https://raw.githubusercontent.com/espressif/arduino-esp32/gh-pages/package_esp32_index.json

* 如果你已經有其他開發板管理網址,請在它們之後添加該網址,用逗號隔開。

3. 點擊「確定」以保存設定。
安裝 ESP32 開發包
1. 打開 Arduino IDE,然後選擇「工具 > 開發板 > 開發板管理器」。
2. 在開發板管理器的搜索框中輸入「ESP32」,找到「esp32 by Espressif Systems」,然後點擊安裝。
選擇 ESP32 開發板
安裝完成後,進入「工具 > 開發板」,從列表中選擇「ESP32 Dev Module」,這是常用的 ESP32 開發板型號。
使用 printf() 控制 ESP32 的 LED閃爍
我們將使用內建的 LED,通常它連接到 GPIO 2 引腳。在這個範例中,我們將每秒將 LED 開啟和關閉,同時使用 printf() 來打印狀態信息到序列監視器。
// Define the pin number for the built-in LED
#define LED_BUILTIN 2

void setup() {
  // Initialize serial communication at 115200 baud rate for debugging
  Serial.begin(115200);

  // Initialize the LED pin as an output
  pinMode(LED_BUILTIN, OUTPUT);

  // Print a setup completion message
  printf("Setup complete. LED is ready to blink.\n");
}

void loop() {
  // Turn the LED on
  digitalWrite(LED_BUILTIN, HIGH);
  printf("LED is ON\n");
  delay(1000);  // Wait for 1 second

  // Turn the LED off
  digitalWrite(LED_BUILTIN, LOW);
  printf("LED is OFF\n");
  delay(1000);  // Wait for 1 second
}

// Custom printf function to format and send output to the serial monitor
int printf(const char* format, ...) {
  char buffer[128];   // Create a buffer to store formatted output
  va_list args;       // Variable argument list

  va_start(args, format);            // Initialize args to store all values after 'format'
  vsnprintf(buffer, sizeof(buffer), format, args);  // Create formatted string in buffer
  va_end(args);                      // Clean up the variable argument list

  return Serial.print(buffer);       // Output the buffer to the serial monitor
}
* pinMode(LED_BUILTIN, OUTPUT) 將內建 LED(連接到 GPIO2)設置為輸出引腳。
* 在 setup() 函數中,我們使用 Serial.begin(115200) 初始化序列通訊,並打印一條消息以指示設置完成。
* 在 loop() 函數中,我們使用 digitalWrite() 來開啟和關閉 LED,並使用自定義的 printf() 函數打印狀態消息(「LED is ON」和「LED is OFF」)。
* 自定義的 printf() 函數使用 vsnprintf() 來格式化消息,然後通過 Serial.print() 將其發送到序列監視器。
將程式上傳到 ESP32
1. 使用 USB 數據線將 ESP32 開發板連接到電腦。

2. 在 IDE 編輯器中,前往 工具 > 端口,選擇正確的端口(例如,Windows 上通常是 COM3,Linux/macOS 上是 /dev/ttyUSB0)。

3. 點擊 上傳 按鈕,將程式上傳到 ESP32。
查看結果
上傳成功後,打開 IDE 編輯器 的 序列監視器(快捷鍵:Ctrl + Shift + M or MacOS Command + Shift + M),並將波特率設置為 115200,以匹配 Serial.begin() 中的設置。你應該能在序列監視器中看到以下輸出:
Setup complete. LED is ready to blink.
LED is ON
LED is OFF
LED is ON
LED is OFF
...
結論
我們介紹了如何設置 Arduino IDE 以支持 ESP32,並編寫程式控制內建 LED,使用 printf() 進行除錯和示範。這個簡單的項目是一個很好的起點,讓任何人都能探索 ESP32 在物聯網應用中的強大功能。隨著進一步的學習,你可以將這個項目擴展到整合 Wi-Fi、藍牙、感測器和其他外圍設備,創建更複雜的應用程序。

關鍵的收穫是,ESP32 與 Arduino IDE 的結合使微控制器項目的開發和除錯變得簡單。使用 printf() 函數可以幫助你跟蹤程式的執行流程,及時捕捉錯誤並優化代碼。

開始動手吧,享受與 ESP32 一起實驗的樂趣!

