智能合約使用硬帽包 Hardhat
內容
Hardhat 簡介
Hardhat 是一個用於編譯、測試、部署和調試的以太坊開發環境。事不宜遲,讓我們開始吧!
準備工作
- 已安裝了 MetaMask 並創建了個人帳戶
- 已在 MetaMask 中添加了 Goerli 測試網
- 已獲得 Goerli 的 ETH
- Free ???? https://goerlifaucet.com/ ( Need to complete the registration first )
- 已安裝了 Node.js
- 獲取了 infura 的 API_KEY
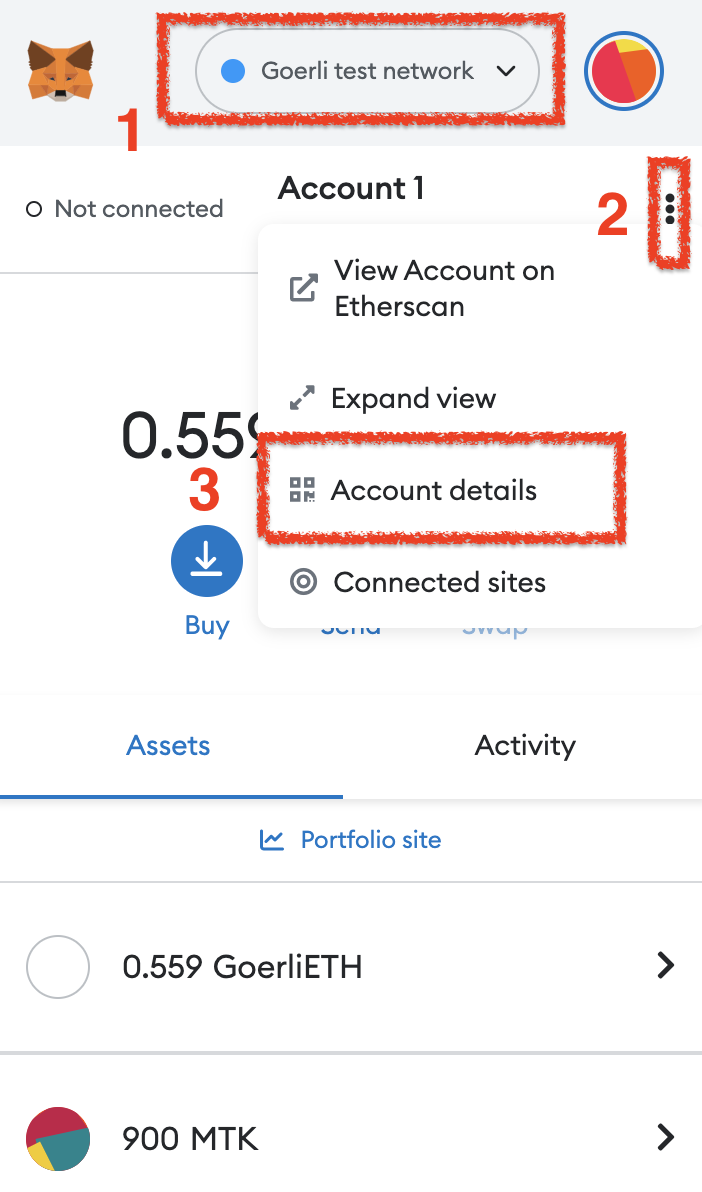
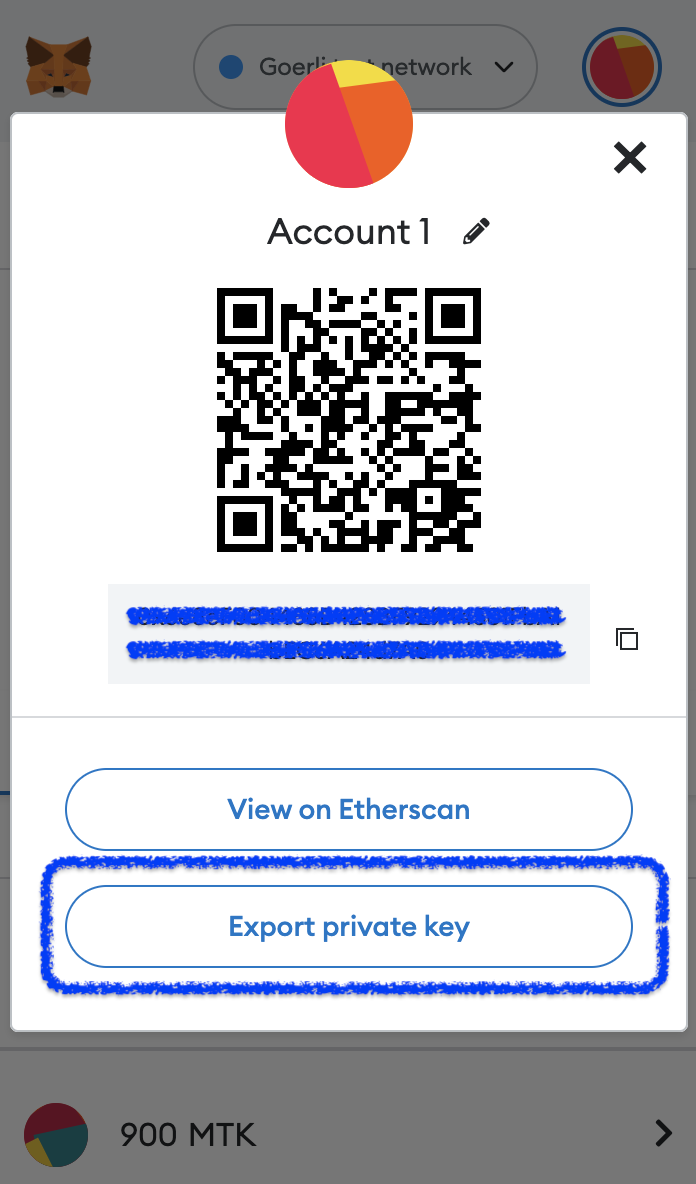
- 獲取到 MetaMask 錢包的私鑰
創建一個 Node.js 專安
❖ 創建一個項目文件夾,例如 "hello_world" 和運行 "npm init -y" 如下所示(使用 macOS)...
mkdir hello_world ↩️
cd hello_world ↩️
npm init -y ↩️
當使用 "npm" 時你需要先安裝 "Node.js"。
"-y" 表示在項目初始化時使用系統默認的基本配置信息。
安裝 Hardhat 包
❖ 然後你需要在 hello_world 專案夾安裝 Hardhat 包如下所示 ...
npm install --save-dev hardhat ↩️❖ 安裝完成後,可以進入以下命令查看已安裝的文件。
ls -a ↩️ . node_modules package.json .. package-lock.json
創建一個 Hardhat 項目
❖ 運行 "npx hardhat" 如下所示...
npx hardhat ↩️ 888 888 888 888 888 888 888 888 888 888 888 888 888 888 888 8888888888 8888b. 888d888 .d88888 88888b. 8888b. 888888 888 888 "88b 888P" d88" 888 888 "88b "88b 888 888 888 .d888888 888 888 888 888 888 .d888888 888 888 888 888 888 888 Y88b 888 888 888 888 888 Y88b. 888 888 "Y888888 888 "Y88888 888 888 "Y888888 "Y888 ???? Welcome to Hardhat v2.9.9 ???? ? What do you want to do? … ❯ Create a JavaScript project Create a TypeScript project Create an empty hardhat.config.js Quit
選 " Create an empty hardhat.config.js " ↩️888 888 888 888 888 888 888 888 888 888 888 888 888 888 888 8888888888 8888b. 888d888 .d88888 88888b. 8888b. 888888 888 888 "88b 888P" d88" 888 888 "88b "88b 888 888 888 .d888888 888 888 888 888 888 .d888888 888 888 888 888 888 888 Y88b 888 888 888 888 888 Y88b. 888 888 "Y888888 888 "Y88888 888 888 "Y888888 "Y888 ???? Welcome to Hardhat v2.9.9 ???? ? What do you want to do? … Create a JavaScript project Create a TypeScript project ❯ Create an empty hardhat.config.js Quit
安裝 OpenZeppelin 和其他包
❖ 在 hello_world 專案文件夾中安裝 openzeppelin 和其他包如下所示 ...
npm install --save-dev @openzeppelin/hardhat-upgrades ↩️npm install --save-dev @nomiclabs/hardhat-ethers ethers ↩️npm install --save-dev @nomiclabs/hardhat-waffle ↩️npm install @openzeppelin/contracts ↩️安裝 Dotenv 包並配置 .env
❖ 安裝 Dotenv 包如下...
npm install dotenv ↩️❖ 創建一個 .env 文件如下...
touch .env ↩️❖ 打開 .env 文件並輸入如下環境變量...
PRIVATE_KEY=YOUR_PRIVATE_KEY❗️❗️❗️ "YOUR_PRIVATE_KEY" 可以在您的 MetaMask 中獲得。
配置 hardhat.config.js
❖ 打開您的 hardhat.config.js 文件並添加如下代碼...
require("@nomiclabs/hardhat-waffle");
require('@openzeppelin/hardhat-upgrades');

require('dotenv').config();

/** @type import('hardhat/config').HardhatUserConfig */
module.exports = {
  solidity: "0.8.17",
  networks:{
    goerli:{
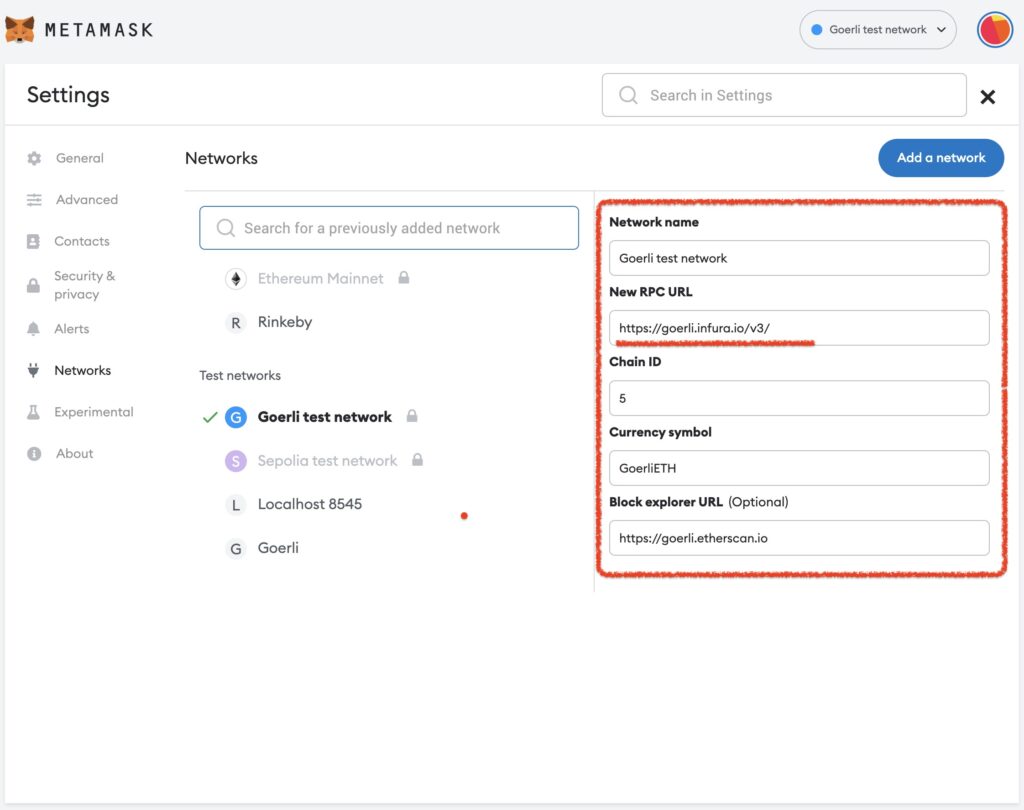
      url : `https://goerli.infura.io/v3/YOUR-API-KEY`,
      accounts: [`0x${process.env.PRIVATE_KEY}`]
    }
  }
};
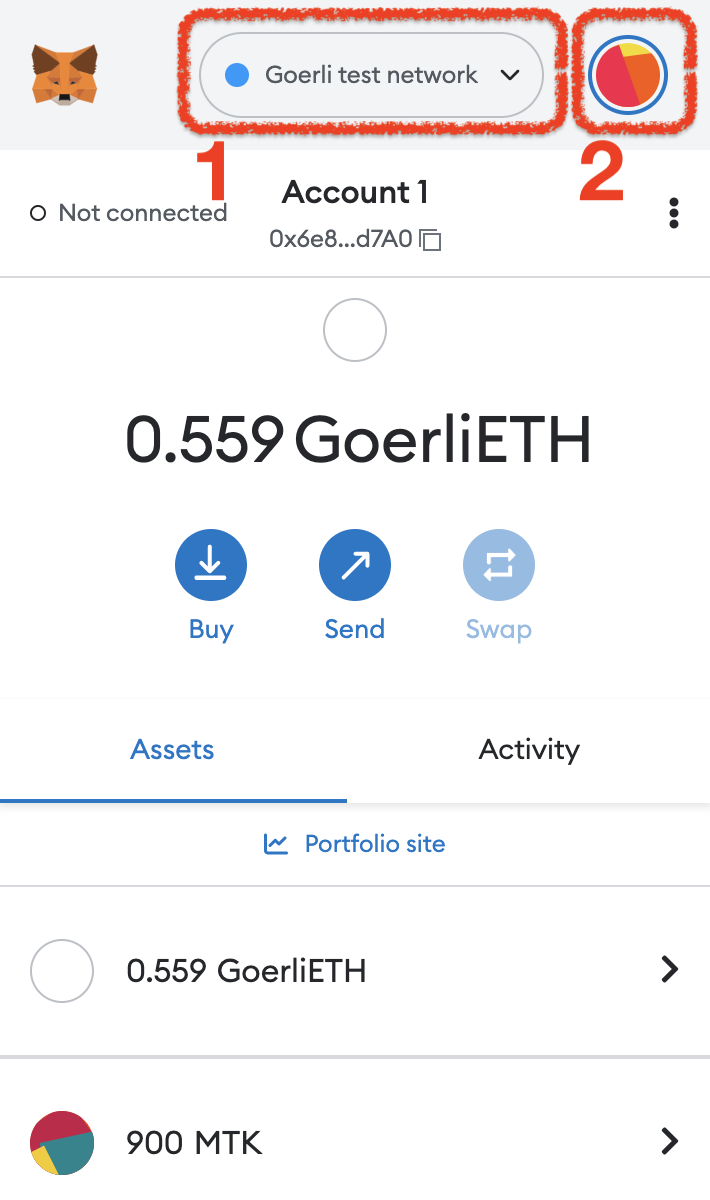
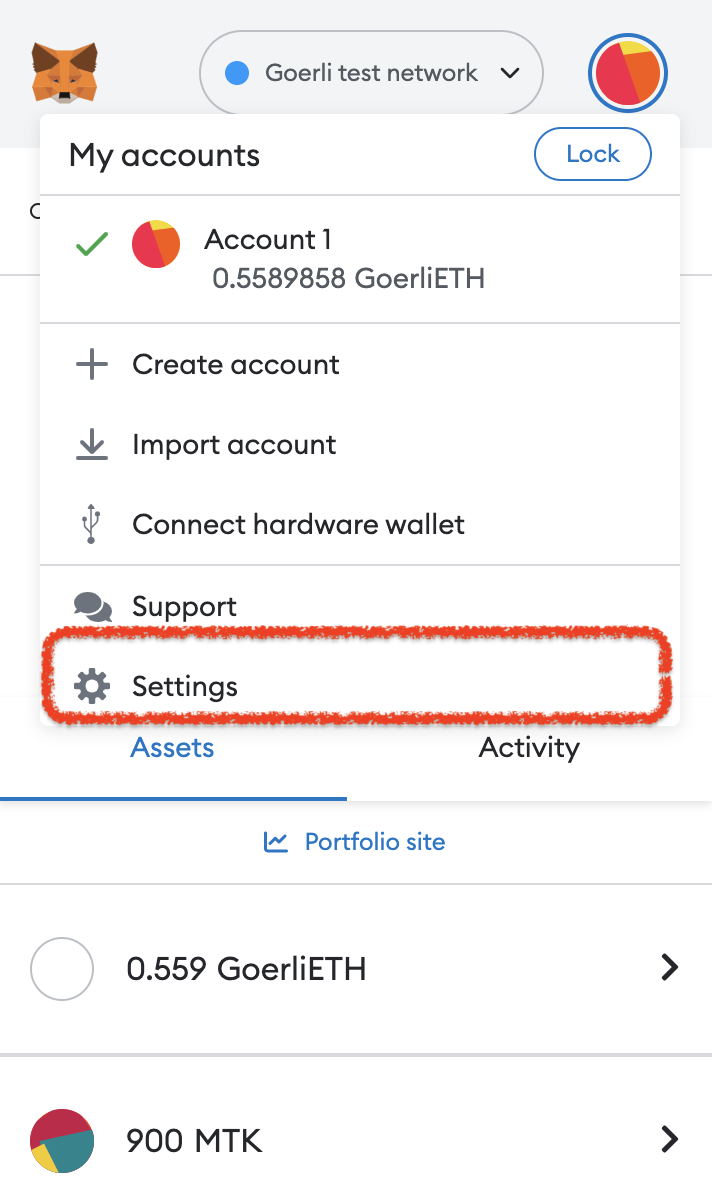
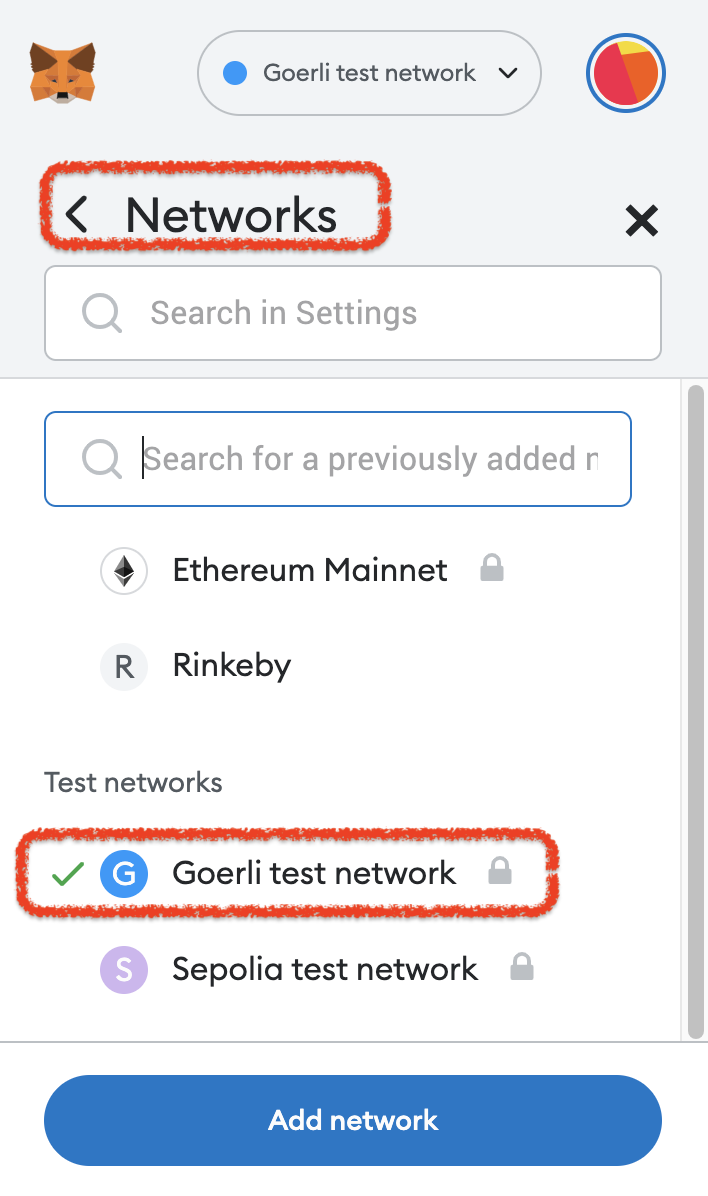
❗️❗️❗️ "YOUR-API-KEY",因為我們使用的是 "Goerli test network",所以你需要先在 "app.infura.io" 中創建一個項目,然後才能獲取 api_key 。
❗️❗️❗️ 如何查看您的 "Goerli test network" 信息如下...
創建合約文件夾和 ERC-20 合約
❖ 在 "hello_world" 專案項目文件夾中創建一個 "contracts" 文件夾和 hello_world.sol 文件,如下所示...
mkdir contracts ↩️
cd contracts ↩️
touch hello_world.sol ↩️
❖ 打開 "hello_world.sol" 文件並添加如下代碼...
// SPDX-License-Identifier: MIT
pragma solidity ^0.8.9;

import "@openzeppelin/contracts/token/ERC20/ERC20.sol";
import "@openzeppelin/contracts/access/Ownable.sol";

contract hello_world_token is ERC20, Ownable {
    constructor() ERC20("hello_world_token", "H_W_TK") {
        _mint(msg.sender, 1000 * 10 ** decimals());
    }

    function mint(address to, uint256 amount)
    public onlyOwner {
        _mint(to, amount);
    }
}
❗️❗️❗️ Contract full name : "hello_world_token" ❗️❗️❗️ Contract symbol name : "H_W_TK"
❖ 編譯你的合約 "hello_world.sol" 如下所示...
❗️❗️❗️ 記得先回到你的項目根目錄。
cd .. ↩️
npx hardhat compile ↩️
Compiled 6 Solidity files successfully
部署您的 ERC-20 合約
❖ 在 hello_world 文件夾中創建一個 "scripts" 文件夾和一個 "deploy.js" 文件,如下所示...
mkdir scripts ↩️
cd scripts ↩️
touch deploy.js ↩️
❖ 打開 "deploy.js" 文件並添加如下代碼...
async function main() {
    const [deployer] = await ethers.getSigners();

    console.log("Deploying contracts with the account:",
        deployer.address);

    const weiAmount = (await deployer.getBalance())
        .toString();

    console.log("Account balance:",
        (await ethers.utils.formatEther(weiAmount)));

    // your ERC-20 contract name : hello_world_token
    const Token =
        await ethers
            .getContractFactory("hello_world_token");
    const token =
        await Token.deploy();

    // show your the token address in console window
    console.log("Token address:", token.address);
}

// run main
main()
    .then(() => process.exit(0))
    .catch((error) => {
        console.error(error);
        process.exit(1);
    });
❖ 保存並關閉 "deploy.js" 文件。 ❖ 回到你的項目根目錄。 ❖ 運行 "npx hardhat run scripts/deploy.js --network goerli"。
❗️❗️❗️ 需要支付 Transaction Fee,所以在部署之前首先需要獲得 Goerli's ETH。 您可以在 https://goerlifaucet.com/ 免費獲得。
cd .. ↩️
npx hardhat run scripts/deploy.js --network goerli ↩️
❖ 如果成功,您將看到如下結果...
Deploying contracts with the account: 0x6e8eF004488B428BF92944501FbA1bEC6A24d7A0
Account balance: 0.56278324193332316
Token address: 0xC3E85411B6C734244CB41C40594c85292f63C4a8
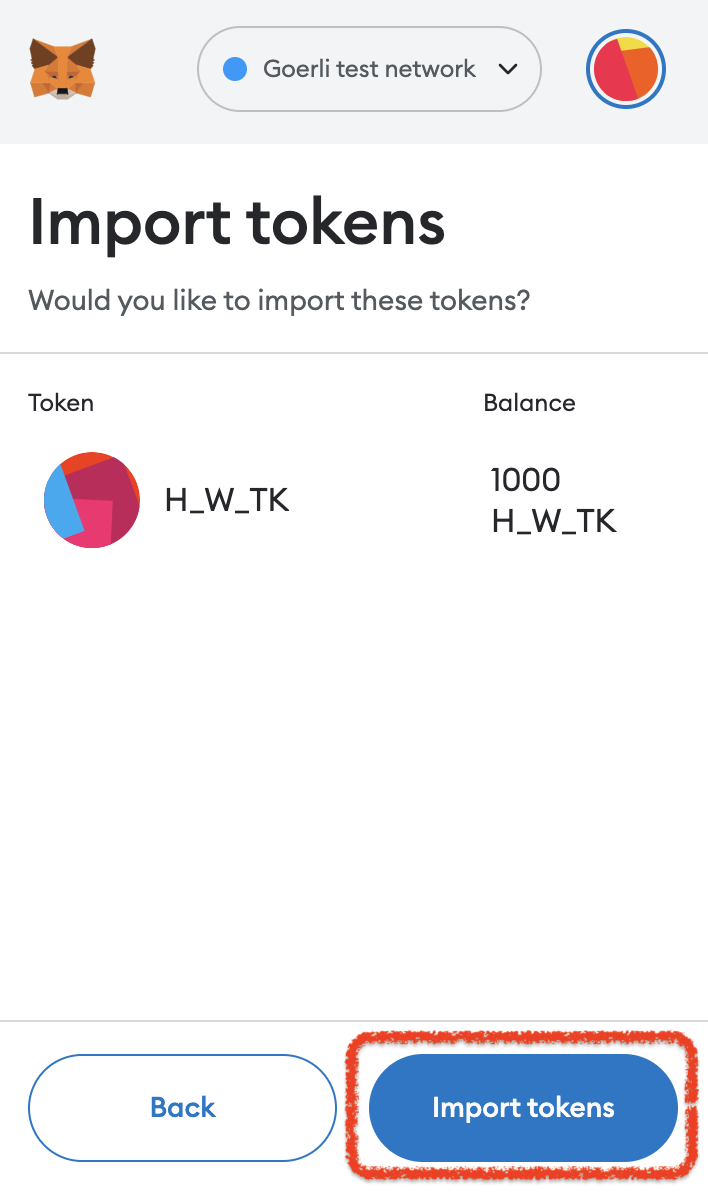
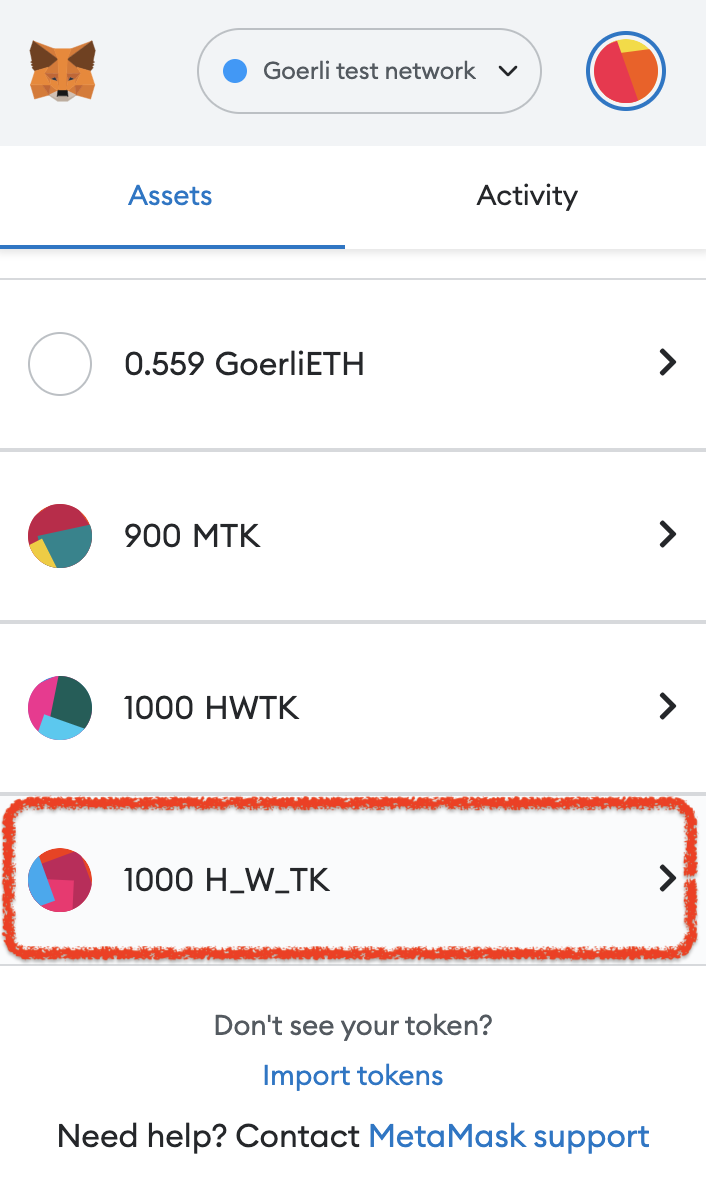
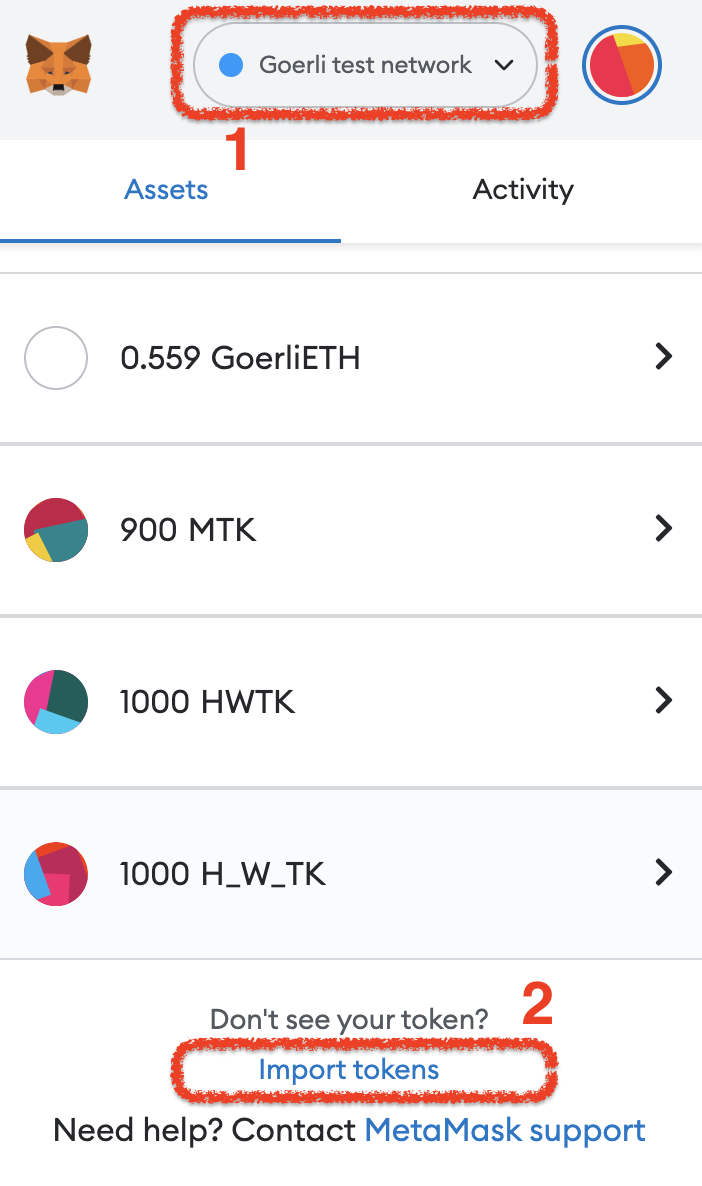
將您的 Token 導入 MetaMask
❖ 複製您的 Token address: 號碼。
例如 "0xC3E85411B6C734244CB41C40594c85292f63C4a8"
❖ 登錄您的 MetaMask 並選擇 "Goerli test network" 的測試網絡。

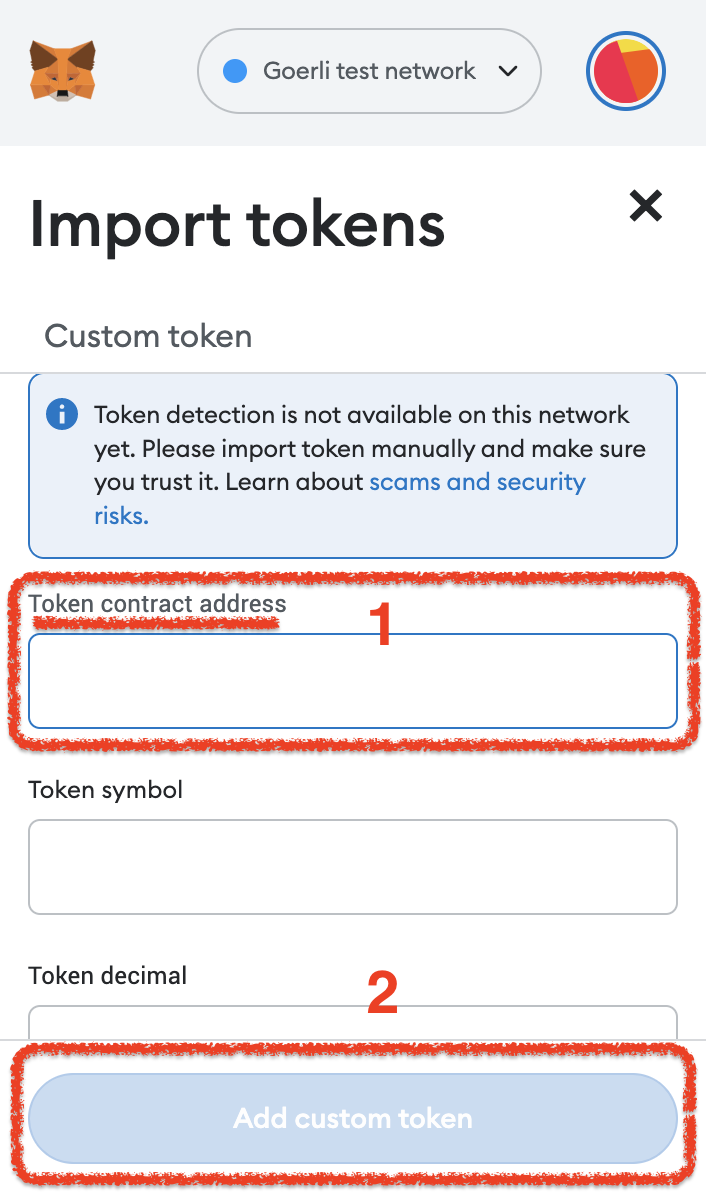
❖ 將您的 "Token address" 粘貼到 "Token contract address" 欄位,然後單擊 "Add custom token" 。
???? 恭喜終於完成了。
