KiCad Plugin Tutorial 2026 | The Ultimate Guide to Effortless PCB Edits!
KiCad Plugin development is the ultimate must-have skill for all PCB designers seeking automation and high efficiency in 2026. Utilizing Python scripting to automate repetitive board designs, modifications, and reworks is the perfect way for hardware engineers to unleash productivity. However, during custom plugin development, we often encounter frustrating moments where the code seems correct but the software refuses to work properly, leaving us with no obvious path to debug.
If you’ve ever faced issues like frozen processes, non-responsive API calls, or the bizarre mystery of plugins that stubbornly remain in the menu even after deleting the file, this article is for you! We will use simple, hands-on steps to guide you through these hidden path traps, making your custom plugin development smooth and highly efficient once again!

Contents
What is a KiCad Plugin?
Simply put, a KiCad Plugin acts as an automated assistant tailored for board designers. Leveraging KiCad’s built-in Python API (Application Programming Interface), you can write automated scripts to handle tedious reworks—such as repetitive mouse clicks, manual trace adjustments, and component alignment—and let the software execute them in a split second.
Learning to develop custom helper plugins means you are no longer just a user of the software, but the “master” of your circuit design workflow. You can vaporize meaningless, repetitive labor with a single click, keeping your precious time focused on high-value hardware architecture and circuit optimization. But before diving into this magical development process, let’s first explore what amazing automations custom plugins can bring to your PCB design.
What Can You Do with a KiCad Plugin?
In real-world PCB (Printed Circuit Board) design, we frequently encounter massive, redundant tasks. With a KiCad Plugin, you can implement highly customized design automations:
- Automated Routing & Area Cleanup
Automatically clear traces in a designated area (like our “One-Click Area Trace Cutter” in this tutorial) or generate shielding and ground grids with specific geometries. - Batch Component Placement & Precise Alignment
When placing arrays of LEDs, test points, or connectors in linear or circular arrays, the plugin can accurately calculate and position each component instantly, saving hours of manual work. - Customized Design Rule Checking (DRC)
Beyond built-in DRC checks, custom scripts can perform specific physical clearance audits, high-speed differential pair analysis, or anti-error design rule verifications. - Automatic Export of Production Deliverables
Generate customized BOM (Bill of Materials), pick-and-place coordinate files, 3D STEP models, or production-ready Gerber files in one go.
Prerequisites & Setup
Before writing our first line of automation code, we need to prepare the runtime environment and essential development tools:
- Install the Latest KiCad 10.0
This tutorial is fully based on the latest KiCad 10.0 stable release, which offers superior Python API bindings and improved SWIG stability. - Prepare a High-Quality Code Editor
We highly recommend using VS Code (Visual Studio Code) with the Python extension, which provides excellent syntax highlighting, formatting, and auto-completion. - Launch the Scripting Console for Instant Verification
In the KiCad PCB Editor, click Tools ➔ Scripting Console to open the built-in interactive Python shell. Typingimport pcbnewand running simple functions here is the quickest and safest way to test API calls.
How to Install Plugins
In KiCad, manual action plugins must follow a specific directory structure. Depending on your operating system, the official plugin discovery directories vary. Understanding these locations is crucial to prevent plugins from failing to load due to incorrect path placement.
Official Discovery Paths
To make KiCad load your custom plugin automatically at startup, you must place the script files in one of the officially designated directories:
- macOS ★ Recommended Path:
~/Documents/KiCad/10.0/scripting/plugins/
(This is a non-hidden user folder, making manual management, editing, and cleanup incredibly easy. We highly recommend using this!) - macOS Preference Path (Hidden):
~/Library/Preferences/kicad/10.0/scripting/plugins/
(This is a hidden folder for user preferences. It is harder to navigate to, so we don’t recommend using it for active development.) - Windows Path:
%APPDATA%\kicad\10.0\plugins\ - Linux Path:
~/.local/share/kicad/10.0/plugins/
Ultimate Path Troubleshooting Guide
When developing KiCad plugins on macOS, you might run into the frustrating situation where you deleted a plugin file, but it stubbornly remains in the KiCad menu, or keeps executing obsolete code after restart. This is usually caused by unreleased memory processes (clicking the red ‘X’ in macOS doesn’t actually quit the app, you must press Cmd + Q to exit) or duplicate files hiding in system directories.
Here are two powerful **Python console debugging commands** to help you inspect KiCad’s runtime environment and trace the exact source of your plugins!
1. Print All Search Paths Configured in Your KiCad Instance
In the PCB Editor, open Tools ➔ Scripting Console, paste the following line, and press Enter:
import pcbnew; print(pcbnew.PLUGIN_DIRECTORIES_SEARCH)2. Ultimate Detective Command: Trace Active Plugin File Paths
If a ghost plugin continues to linger, paste the following line and press Enter to instantly reveal the **exact absolute file path** of the active plugin module!
import sys; print("\n".join([m.__file__ for m in sys.modules.values() if m and hasattr(m, "__file__") and m.__file__ and "trace" in m.__file__]))Plugin Source Code
One-Click Area Trace Cutter Source Code
Here is the production-ready Python script (trace_cutter_action.py) incorporating advanced safety guards, native dialog messages, and clean index-safe routing modification loops:
import sys
import os
import traceback

# 💡 Core safety guard: Prevent duplicate loading of _pcbnew.so shared library in macOS processes
if 'pcbnew' in sys.modules:
    pcbnew = sys.modules['pcbnew']
else:
    import pcbnew

try:
    import wx
except ImportError:
    wx = None

class TraceCutterPlugin(pcbnew.ActionPlugin):
    def defaults(self):
        self.name = "One-Click Area Trace Cutter"
        self.category = "Routing Utilities"
        self.description = "Automatically delete all PCB traces and vias within a specific boundary box"
        self.show_toolbar_button = True
        try:
            self.icon_file_name = os.path.join(os.path.dirname(__file__), 'icon.png')
        except NameError:
            self.icon_file_name = ""

    def show_msg(self, message, is_error=False):
        """Invoke native wxWidgets dialog window with top-level focus"""
        if not wx:
            print(message)
            return
        parent = wx.GetActiveWindow()
        title = "❌ Trace Cutter - Error" if is_error else "✂️ Trace Cutter"
        style = wx.OK | (wx.ICON_ERROR if is_error else wx.ICON_INFORMATION)
        wx.MessageBox(message, title, style, parent)

    def Run(self):
        try:
            # 1. Retrieve the current board editor design object
            board = pcbnew.GetBoard()
            if not board:
                self.show_msg("❌ No active PCB board detected!", is_error=True)
                return

            # 💡 SWIG pointer safety: Cast guard to recover concrete class if object degrades to SWIG pointer
            if not hasattr(board, 'GetLayerID'):
                try:
                    board = pcbnew.Cast_to_BOARD(board)
                except Exception as e:
                    self.show_msg(f"⚠️ [SWIG Cast Failed] {e}", is_error=True)

            # 2. Get the drawing auxiliary layer (User.Drawings)
            target_layer = board.GetLayerID("User.Drawings")

            # 3. Scan for geometry borders drawn on the target layer
            drawings = board.GetDrawings()
            cutter_shapes = []
            for d in drawings:
                if d.GetLayer() == target_layer and hasattr(d, "GetBoundingBox"):
                    cutter_shapes.append(d)

            # 4. Guide users with visual instructions if no boundary shapes are drawn
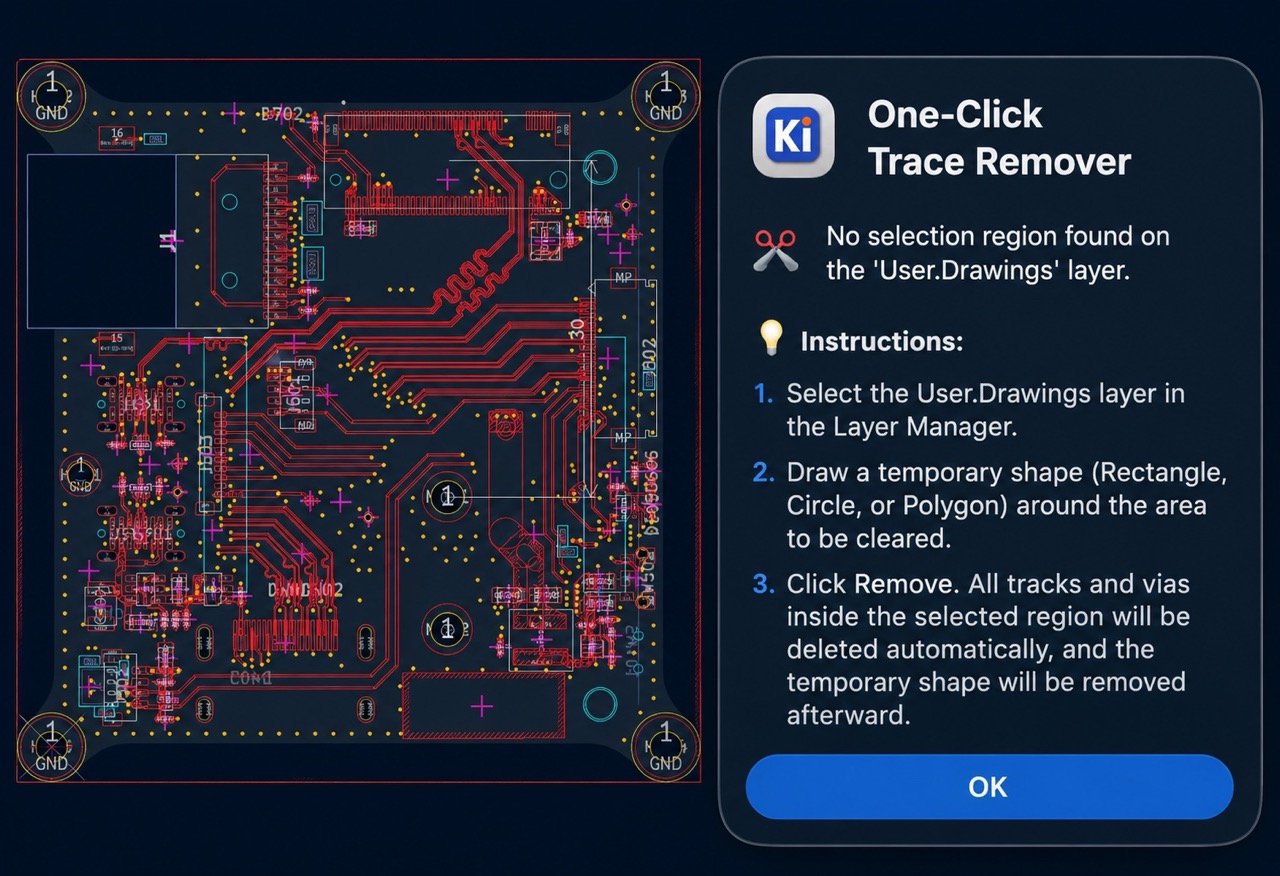
            if not cutter_shapes:
                msg = (
                    "💡 No cutting box detected on the 'User.Drawings' layer!\n\n"
                    "How to use:\n"
                    "1. Select the 'User.Drawings' layer in the right-side Layer Manager.\n"
                    "2. Use graphic tools (e.g., Rectangle or Circle) to draw a temporary cutting box around the traces you want to clear.\n"
                    "3. Click this button. The plugin will delete all traces inside the box and erase the temporary drawings automatically!"
                )
                self.show_msg(msg)
                return

            # 5. Execute safe routing trace removal loop
            tracks = board.GetTracks()
            deleted_count = 0
            for shape in cutter_shapes:
                bbox = shape.GetBoundingBox()
                left = bbox.GetLeft()
                right = bbox.GetRight()
                top = min(bbox.GetTop(), bbox.GetBottom())
                bottom = max(bbox.GetTop(), bbox.GetBottom())

                # Create a copy of the track list to avoid indexing issues during in-place removal
                for track in list(tracks):
                    start_pt = track.GetStart()
                    end_pt = track.GetEnd()

                    # Determine if segment endpoints reside inside the cutting boundary box
                    start_inside = (left <= start_pt.x <= right) and (top <= start_pt.y <= bottom)
                    end_inside = (left <= end_pt.x <= right) and (top <= end_pt.y <= bottom)

                    if start_inside or end_inside:
                        board.Remove(track)
                        deleted_count += 1
                        if track in tracks:
                            tracks.remove(track) # Remove element from memory list safely

                # Erase drawing shape from layer to keep PCB layout clean
                board.Remove(shape)

            # 6. Force canvas view repaint
            pcbnew.Refresh()

            self.show_msg(
                f"✅ Traces cleared successfully!\n\n"
                f"• {deleted_count} tracks inside the cutting box have been deleted!\n"
                f"• {len(cutter_shapes)} temporary drawings have been cleaned up!\n"
                f"• PCB Editor window refreshed!"
            )
        except Exception as e:
            err_msg = f"❌ Plugin encountered a runtime error!\n\nType: {type(e).__name__}\nDetails: {str(e)}\n\nTraceback:\n{traceback.format_exc()}"
            self.show_msg(err_msg, is_error=True)

# Register only when loaded by KiCad externally
if __name__ != '__main__':
    TraceCutterPlugin().register()
Quick Deployment & Testing
Once you have finished writing the script, follow these steps to deploy and test the plugin in your KiCad suite:
- Save Code: Save the Python code block above as
trace_cutter_action.py. - Deploy to Discovery Directory: Copy
trace_cutter_action.pyto the officially recommended search directory:- macOS:
~/Documents/KiCad/10.0/scripting/plugins/ - Windows:
%APPDATA%\kicad\10.0\plugins\
- macOS:
- Open PCB Editor: Start KiCad, and launch the PCB Editor instance.
- Refresh & Run: In the top menu bar, navigate to Tools ➔ External Plugins ➔ Refresh Plugins. Your brand new action plugin will immediately show up in the toolbar or menu dropdown, ready to execute!
Conclusion
Developing custom KiCad Plugins is a true game-changer in the modern co-development era. Mastering these advanced automation mechanisms frees you from endless manual clicks and repetitive board editing. Through this tutorial, we successfully built a practical “One-Click Area Trace Cutter” and explored official platform path structures, as well as high-performance path debugging methodologies. You are now equipped to construct robust, high-efficiency workflows for your future projects.
Next time you face complex layout modifications on your PCB (Printed Circuit Board) designs, don’t rush into manual routing. Stop, set up a simple Python helper script, and automate the pain away. The moment you transition from clicking buttons to programming layout behaviors, you ascend to a whole new level of hardware engineering.